Before you use the Deep Linking Tool (DLT) to add links to your Blackboard course, two things need to be done:
- Your campus Blackboard administrator has installed the DLT 1.3 Tool.
- You have a Norton user account.
If you think either of these isn’t already done, then reach out to your Norton rep for help.
If you’ve confirmed you’re ready to go, you can get started by launching Norton Deep Linking Tool from your Blackboard content area, or review the steps below for more details.
Log into the Deep Linking Tool with your Norton account
1. The W. W. Norton Learning Tools deep linking tool is accessed from any Content area in Blackboard.
Ultra View
From any content area click Add Content, and choose the Content Market. From the Institution Tools section, select W. W. Norton Deep Linking.


Original View
From any content area click Build Content, and select Norton Learning Tools.


2. In a new tab, W. W. Norton Learning Tools will open, and ask you to log in.
- Log in using the email and password tied to your Norton account.
- You need to have a Norton account already. If you don’t, then reach out to your Norton rep for help.

Create a Norton course, which is matched to your Blackboard course
3. Next you’ll create a Norton course.
- Each Blackboard course is matched to a Norton course. You’ll need to set this up just once per Blackboard course.
- This is a 4-step process.
4. Create a Course, Step 1. This step confirms that you’re connected with your Blackboard course.

5. Create a Course, Step 2. Select your course material.

You can search for course material in two ways:
a. Search by Book Title. Use this search to browse from available titles to find the textbook you’re assigning. This will be the most commonly used option.
1. Use the type-ahead discipline and book title fields to find your Norton text
2. Use the cover and edition details to choose the correct version

b. Enter Product Code. Use this option if your Norton representative or specialist provided you with a custom title code. Type the title code into the text entry field.

6. Confirm that you’ve selected the right book for your course.

7. If you need to opt in to any First Day or Inclusive Access program, you’ll be prompted to do so.

8. Create a Course, Step 3. Enter some required course details.
- The School Type, Country, School State/Province, and School Name fields all work to tie your course to the right school record.
- The Course Name can be up to 35 characters long.
- The Start Date is the first day of student access to the course.
- The End Date is when you expect all course grades to be final.

9. Create a Course, Step 4. Confirm all your course information and create the course.
- Or, to correct anything, use the “Previous” button to go back and edit it.

10. Click Create Course, and you will be taken to the content selector.
Select and send links into your Blackboard course
Choose your integration type
For graded assignments, you may choose to send individual assignment links (most popular), or product homepage links.
- Choose individual assignment links if you want your students to access separate links for each assignment in Blackboard. This will create separate grade columns in the Blackboard gradebook for each assignment per student.
- Choose product homepage links if you want your student to have one link in Blackboard for each Norton product. This will create one grade column for each Norton product in the Blackboard gradebook per student. This grade is a cumulative average of all assignments for that product.

Option 1: Adding deep links to individual assignments:
After you select "I want individual assignment links for Blackboard", you'll see the Select Norton Learning Tools screen
- Each linkable resource for your book is listed here.
- They’re grouped into sections according to type.
- As you browse these, you can expand or hide activity sections by clicking the gray section headings.
- You don’t have to select all your links at once
- You can launch this tool from your Blackboard course to add additional links throughout the semester

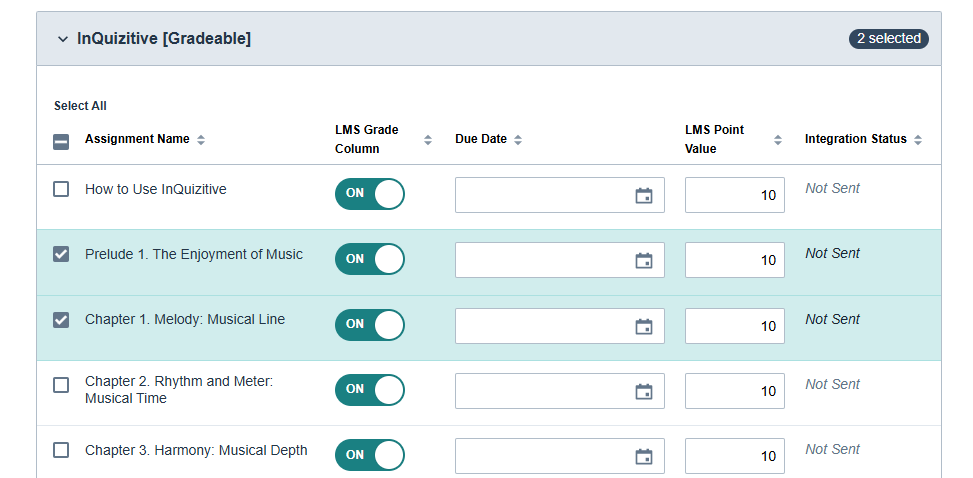
1. Check off any link you would like to send to your LMS

2. If you turn LMS Grade Column on, the link will be sent as a graded LTI link, with a corresponding grade column with the specified LMS point value.
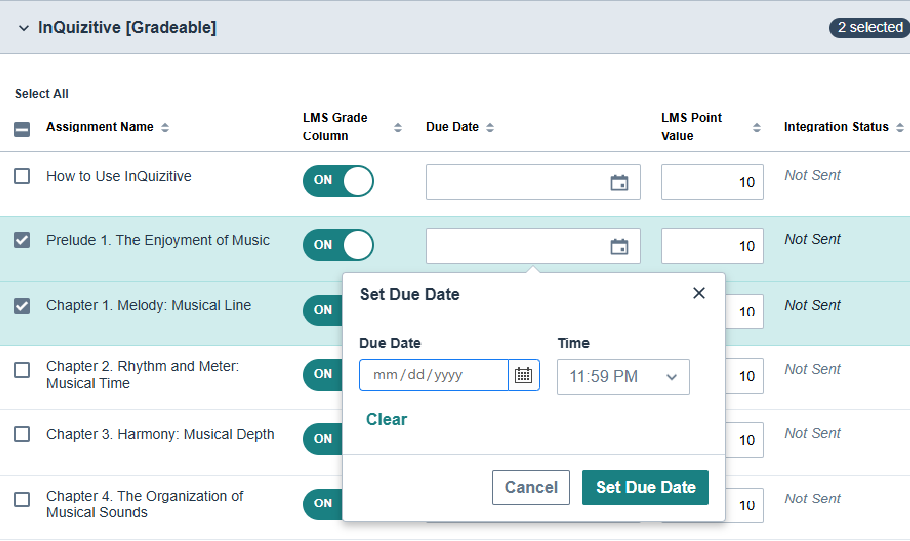
For graded assignments, you may set a due date and edit the LMS point value

This due date is saved both into the Blackboard course and into Norton’s activity settings, so the student will see consistent information about when an assignment is due.
But, please be aware that if you change the due date after you've linked the activity to Blackboard, you will need to update both in Blackboard and in Norton. The dates don't keep in sync automatically after the activity is sent to Blackboard.
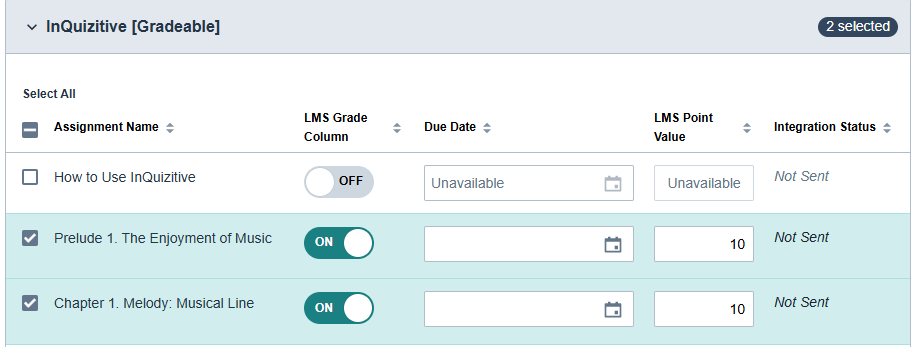
3. If you turn LMS Grade Column off, the link will be sent as an ungraded LTI link, and no grade will report to the LMS.

4. Products that are ungradable will only be sent over as ungraded LTI links.


Option 2: Adding deep links to product homepages:
After you select "I want product homepage links for Blackboard", you'll see the Select Norton Learning Tools screen
- Each linkable resource for your book is listed here.
- They’re grouped into sections according to type.
- As you browse these, you can expand or hide activity sections by clicking the gray section headings.
- You don’t have to select all your links at once
- You can launch this tool from your Blackboard course to add additional links throughout the semester

1. Check off any link you would like to send to your LMS
2. If you turn LMS Grade Column on, the link will be send as a graded LTI link, with a corresponding grade column with the specified LMS point value.
- Edit the LMS point value by typing a new value in the box

3. If you turn LMS Grade Column off, the link will be send as an ungraded LTI link, and no grade will report to the LMS.

4. Products that are ungradable will only be sent over as ungraded LTI links.

Sending links to Blackboard
5. Click the Review button at the bottom of the screen.
6. You’ll see a summary of the links you selected. Confirm, and Send to Blackboard.

7. When complete, the modal will close, and you will see the content in your Blackboard course
Organizing content in your Blackboard course
8. In your Blackboard course you’ll see the Norton content you sent
- All links will be set to open in a new window.
- Graded activities will come in with the LMS “points possible” and “due date” based on the setting you made when sending the links.
- Corresponding columns will be created in the Blackboard Gradebook.
Ultra View:


9. All of the links and assignments are published in Blackboard by default.
- That is, they are visible to students unless you choose to hide them.
10. You can reorganize or regroup your links in Blackboard so that your course is laid out the way you want.
11. If you have sent Product Homepage links, you can set due dates on individual assignments within the product. Launch the product homepage link from Blackboard and set due dates or edit assignments within the product.
Original View:


Sending additional content from Norton Learning Tools
12. You can return to Norton Learning Tools as many times as you want, and send more links into Blackboard.
13. When you return, you’ll see an indication of links that were already sent into the course. Your previously set Due Dates and LMS Point Values will be displayed.

14. You can resend links. But you should only resend a graded item if you have deleted it from your Blackboard course. Having duplicate links for graded items in your course will cause gradebook issues for your students.
Submit a Support Request
Still need help? Submit a support ticket and a customer support specialist will be happy to assist you.
Opened a request already? Click here for an update.
