Getting started with Norton digital products—ebooks, InQuizitive, Smartwork, and more—is easy. This article provides instructions for setting up a course using Norton's Digital Landing Pages. Instructors who wish to integrate their Norton digital products with their school's Learning Management System (LMS) should visit the help notes on LMS Integration.
How do I access Norton digital products?
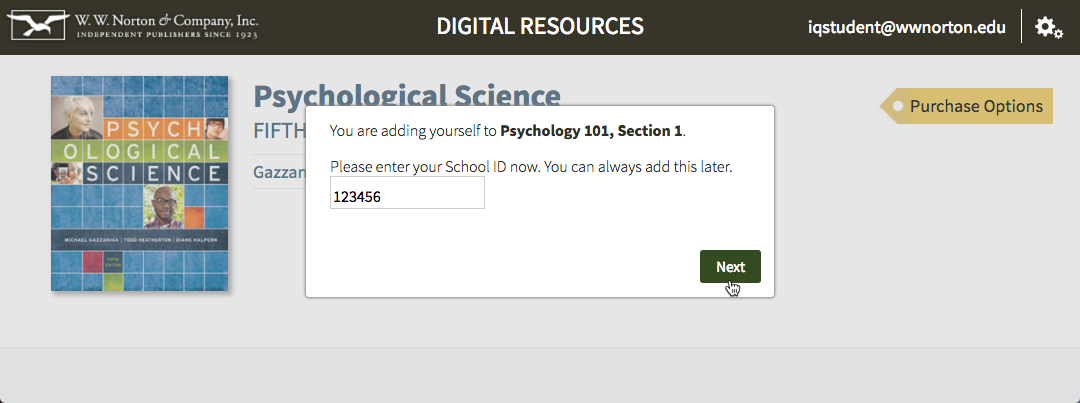
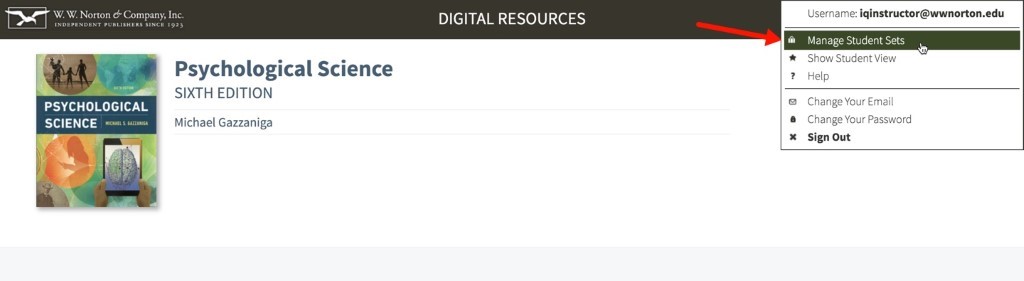
Log in to your textbook's digital resources page using your email address and Norton instructor account password.
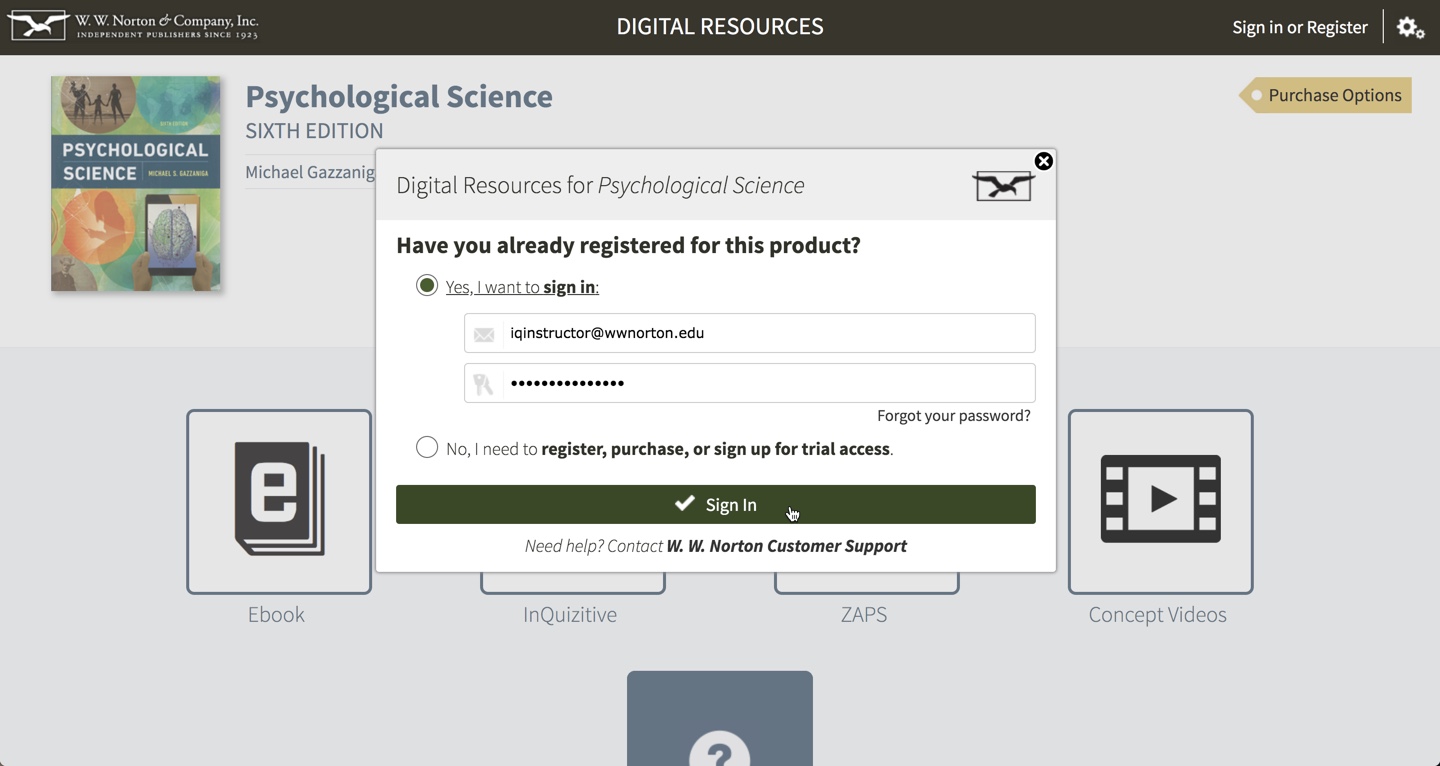
Don't have a password? Visit https://wwnorton.com/educator . Once on the site, choose College or High School and go to the discipline menu on the left. Find your book's instructor resource page, and request instructor account access.
What are Student Sets?
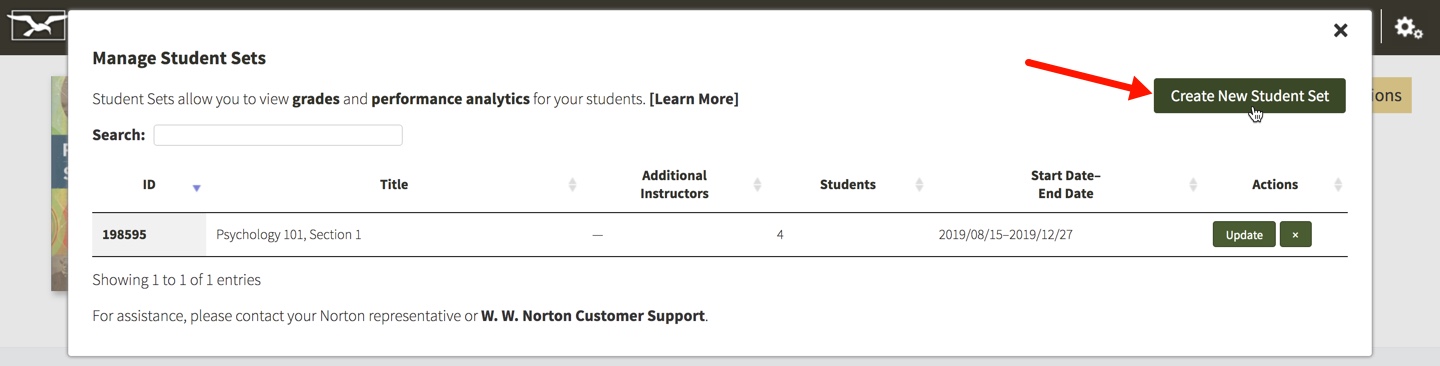
A Student Set is your class section. Student Sets allow you to view the results of the work completed by a particular group of students.
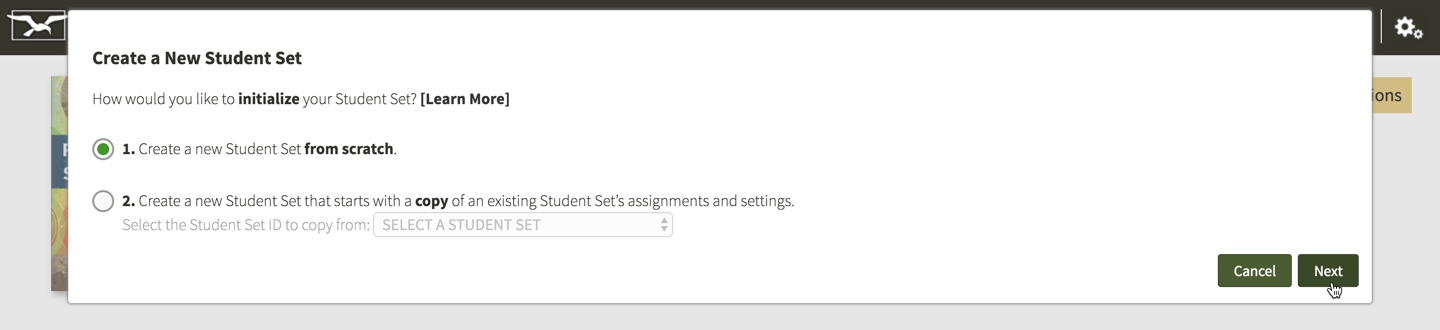
There are two ways for you to create a Student Set: from scratch or by copying an existing Student Set to create a new Student Set.
Basing your Student Set on an existing Student Set allows you to copy any assignments and settings that you've used in one Student Set into another Student Set. You may want to create a Student Set based on an existing Student Set if you are teaching multiple sections of the same course. Furthermore, if you and another instructor are both teaching different sections of the same course, you have the option to base your Student Set on the other instructor’s Student Set by using the copy function.
How do I create a new Student Set?
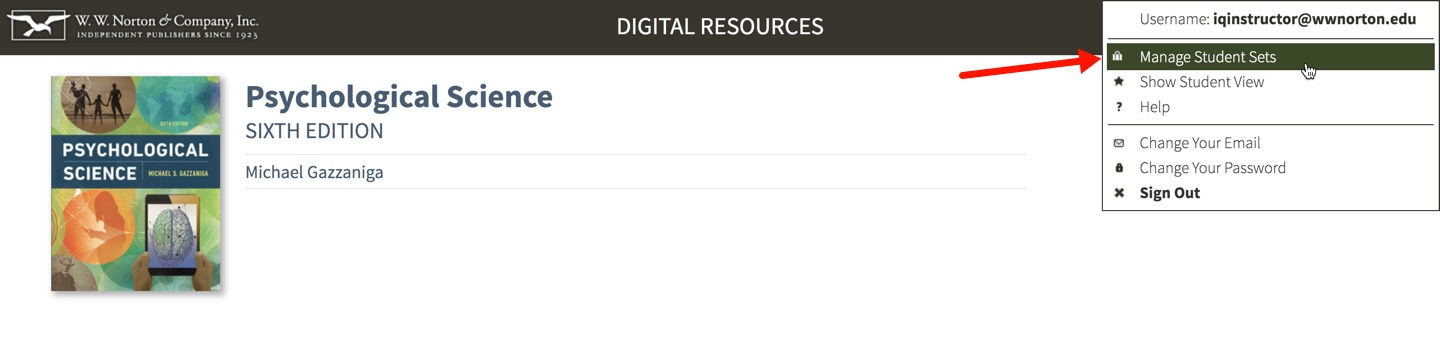
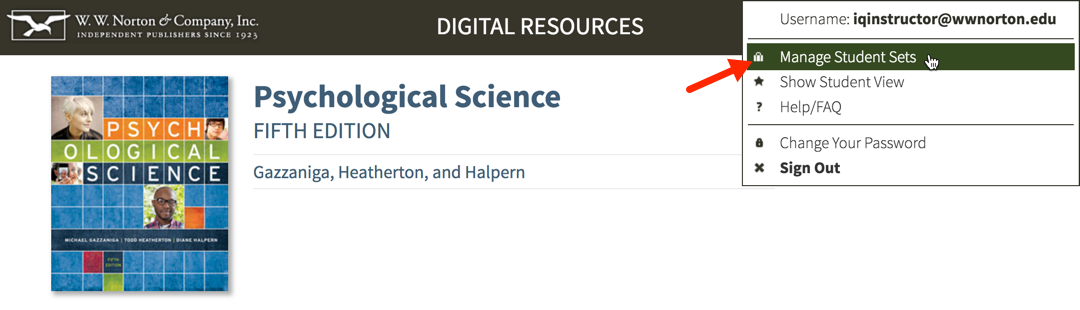
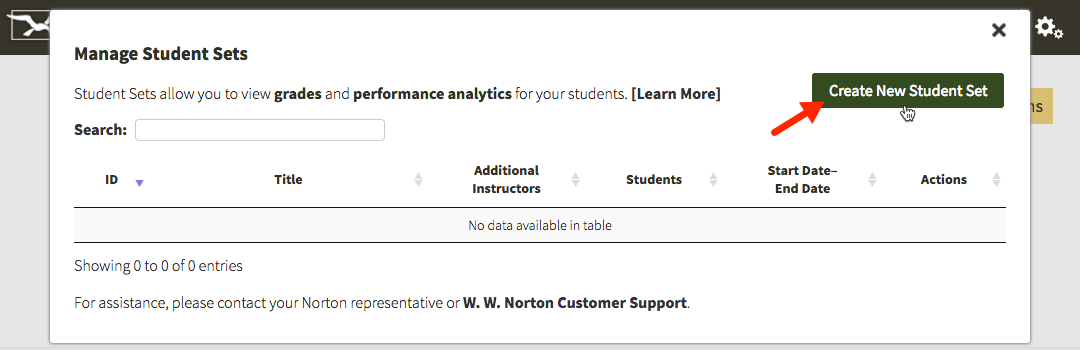
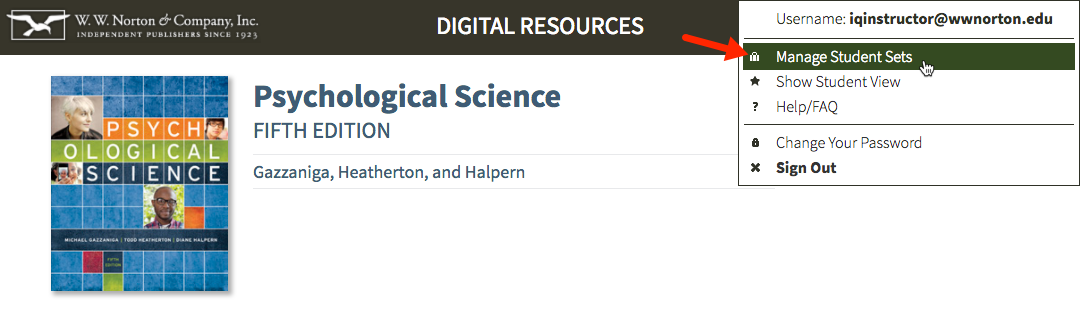
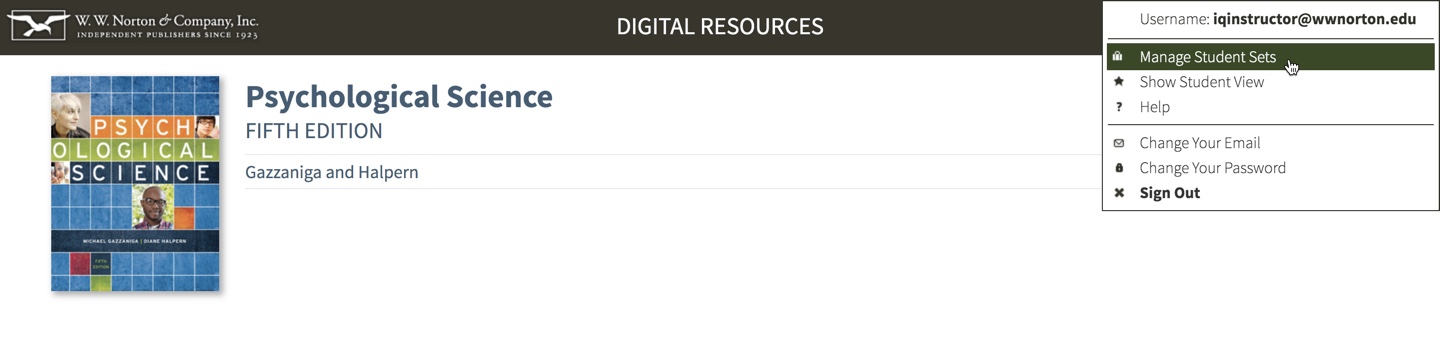
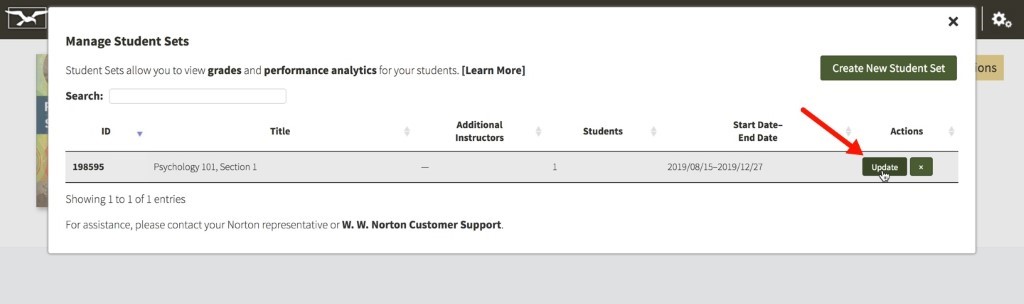
Click on the gear menu in the upper-right corner of the Digital Resources page and select Manage Student Sets from the menu.
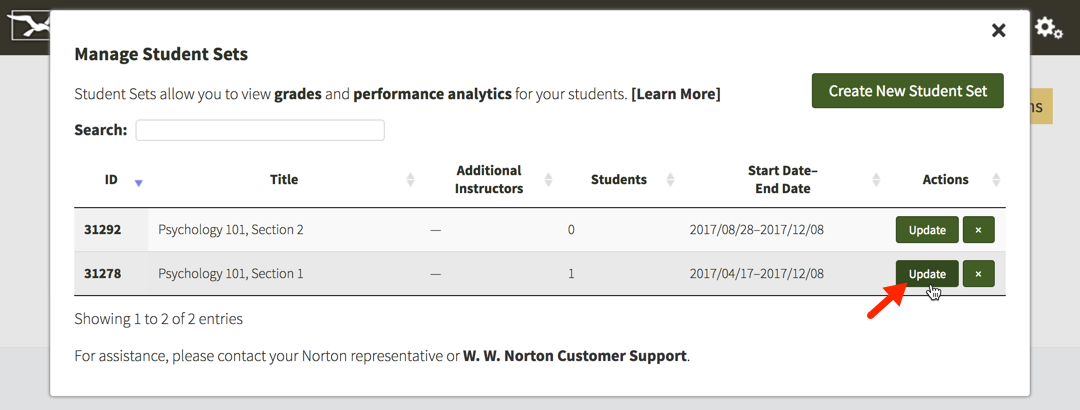
Click the Create New Student Set button.
Select the type of Student Set you would like to create and click the Next button.
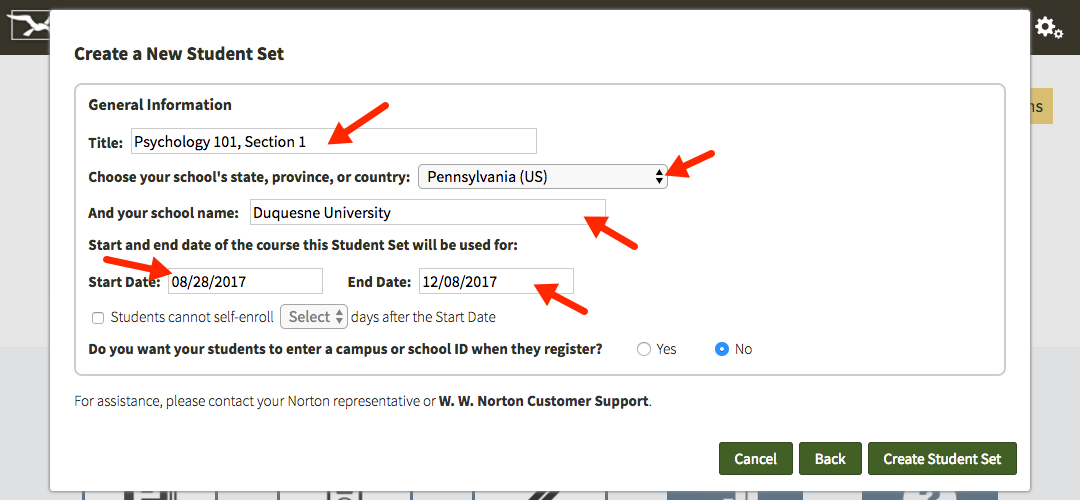
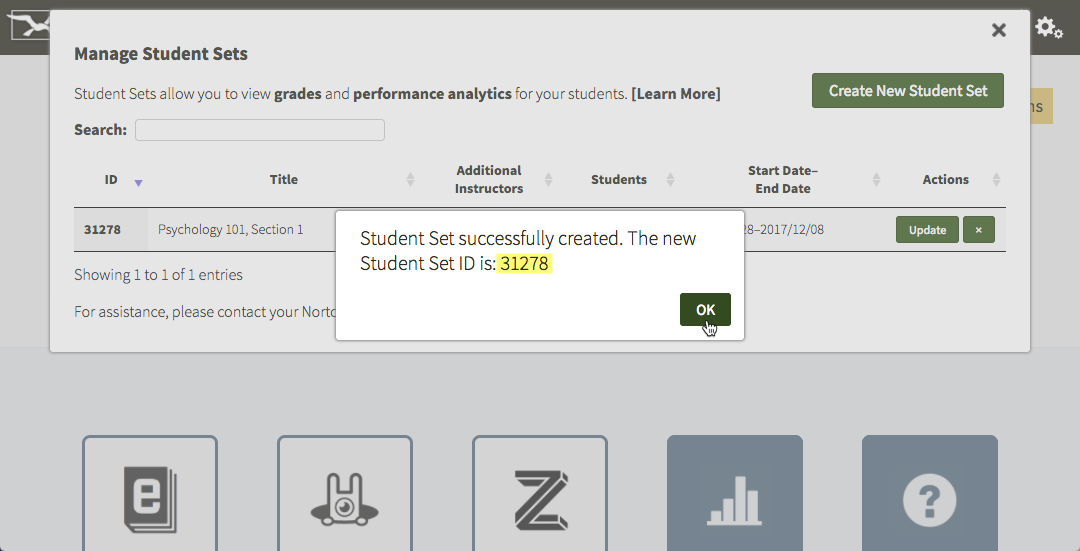
 Enter a title for your Student Set; select your state, province, or country; start typing your school's name into the field that appears and select your school from the list; set a start and end date for the Student Set; and finally, click the Create Student Set button. Make a note of the Student Set ID number and distribute it to your students.*
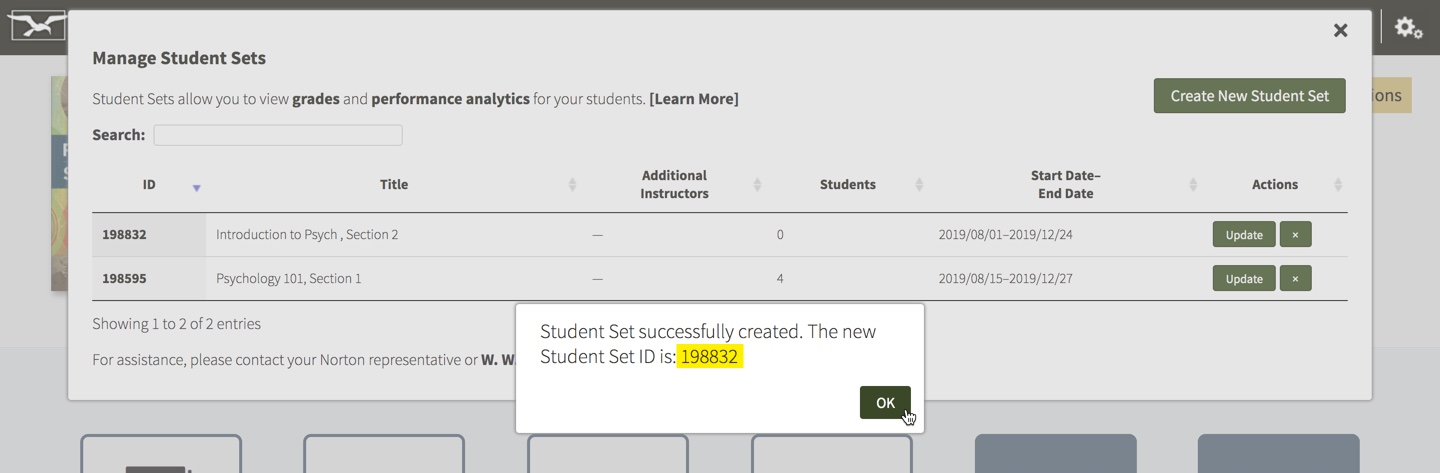 *If you forget your Student Set ID number, you can locate it by opening the Gear Menu and selecting Manage Student Sets. The Student Set ID will be listed in the left-most column of the Manage Student Sets pop-up window.
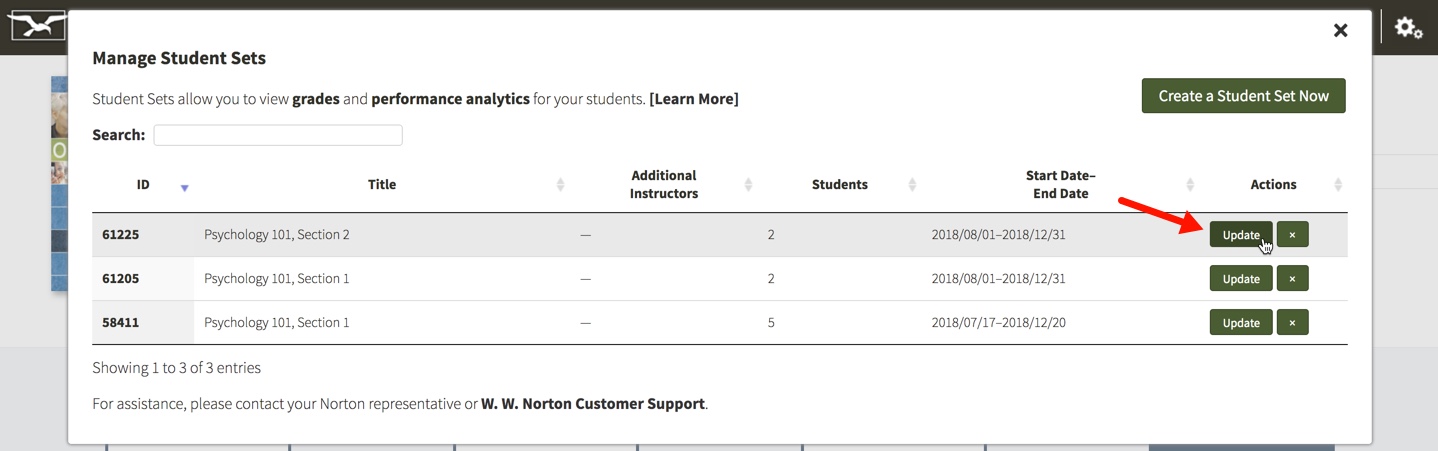
How do I edit an existing Student Set?
Note: You can edit any part of the information related to a Student Set except for the associated school and the Student Set ID number itself.
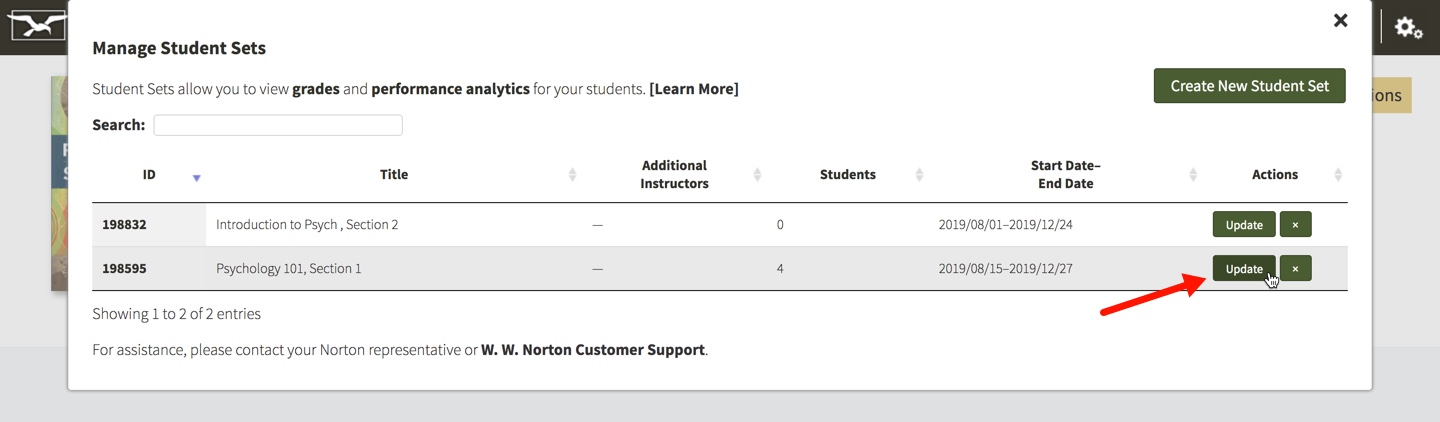
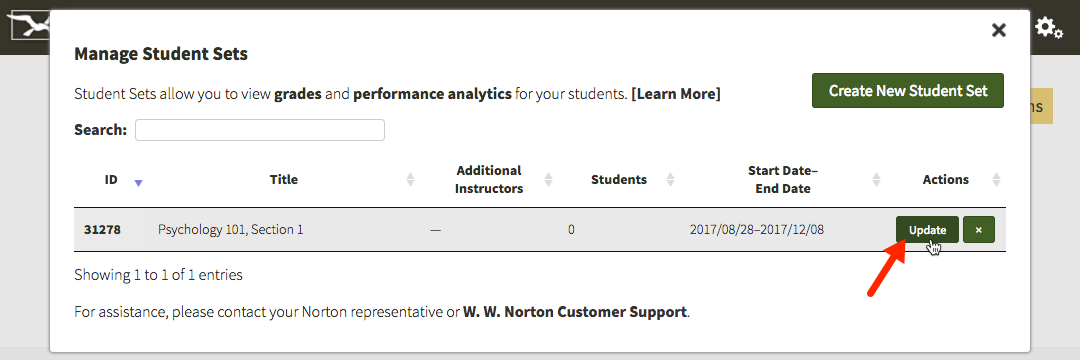
Click on the gear menu in the upper-right corner of the page and select Manage Student Sets from the menu.

Click the Update button to the right of the Student Set you would like to edit.
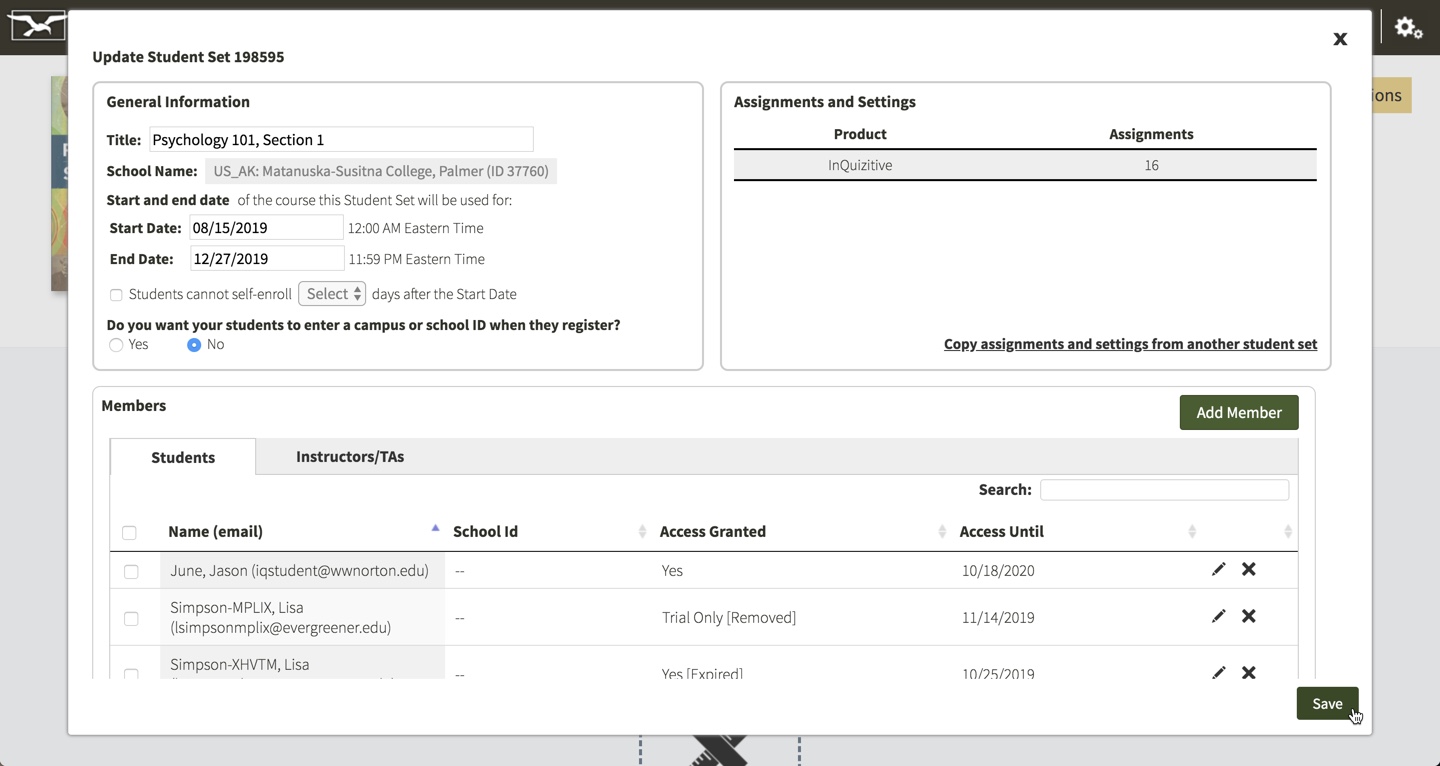
When you are finished editing the Student Set, click the Save button to save your changes and return to the Manage Student Sets window.
How do I add a Co-Instructor, Teaching Assistant, or Scoring Teaching Assistant to my Student Set?
In all Norton digital products, you can add a Co-instructor, a Scoring Teaching Assistant, or a Teaching Assistant to your Student Set. Each role has a different set of permissions. Click on your product to see a complete list of role permissions for Teaching Assistants, Scoring Teaching Assistants, and Co-Instructors.
Note: Adding a Teaching Assistant (TA) or Scoring Teaching Assistant (STA) to your Student Set will not grant that account access to the associated product(s); the TA or STA will still need to register or purchase access to be able to use the Digital Resources for your textbook.
Click the gear menu at the upper-right of the page and select Manage Student Sets from the menu.

Click the Update button to the right of the Student Set to which you would like to add a co-instructor, Scoring TA, or TA.

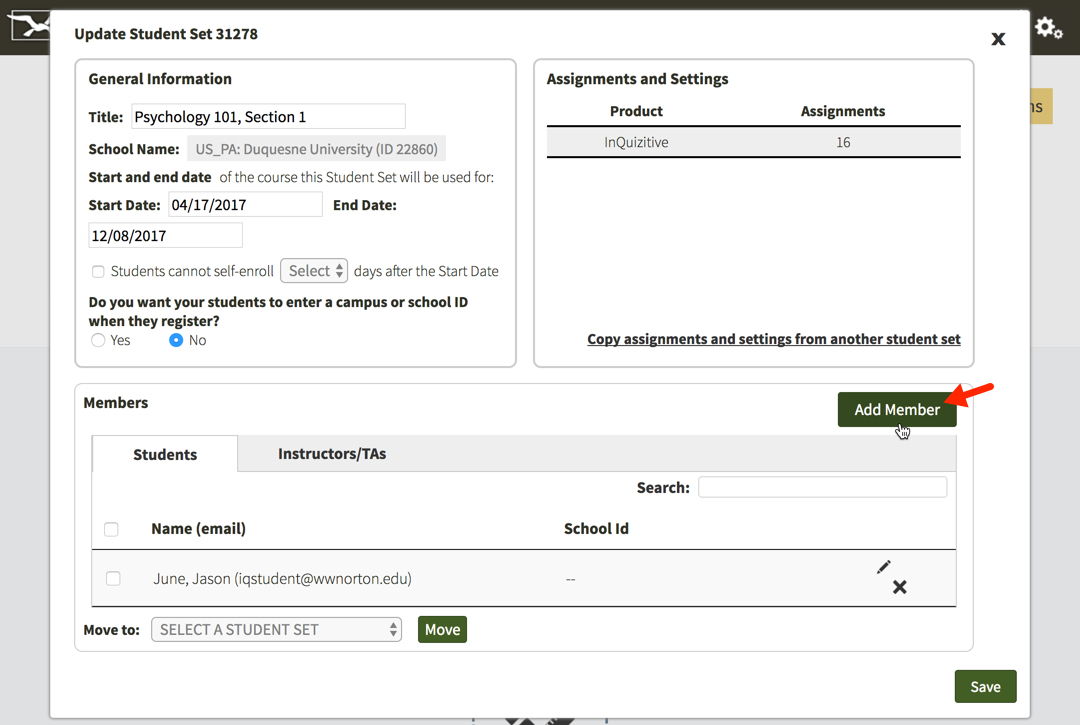
In the Members section, click the Add Member button.
In the Role dropdown menu, select the permission level you would like to give the person you are adding to your Student Set. (For a comparison of the four different roles, please see the Overview of Role Permission links above.) Type in the person's email address and click the Lookup button.
- If you are adding a co-instructor as a Full Instructor, the person must have a Norton account with full instructor privileges. For help with this, please contact your Norton Representative.
- If you are adding a Teaching Assistant or Scoring Teaching Assistant, the person does not need to have a pre-existing Norton account. In the case that they do not have a Norton account, we will send them an email with log in instructions once you add them to your Student Set.
- If you are adding a student as a Teaching Assistant or Scoring Teaching Assistant, you are changing their permissions in all Norton products. If they are enrolled as a student in another Student Set, please have them register with a separate email address when logging in as a Teaching Assistant or Scoring Teaching Assistant.
- Once you give an account a specific level of permission in your Student Set, you cannot downgrade that account to a lower permission level. For example, if you give an account Scoring Teaching Assistant access, you cannot downgrade that account to Teaching Assistant access. If you need assistance with downgrading a Teaching Assistant or Scoring Teaching Assistant in your Student Set, please contact Norton Customer Support.
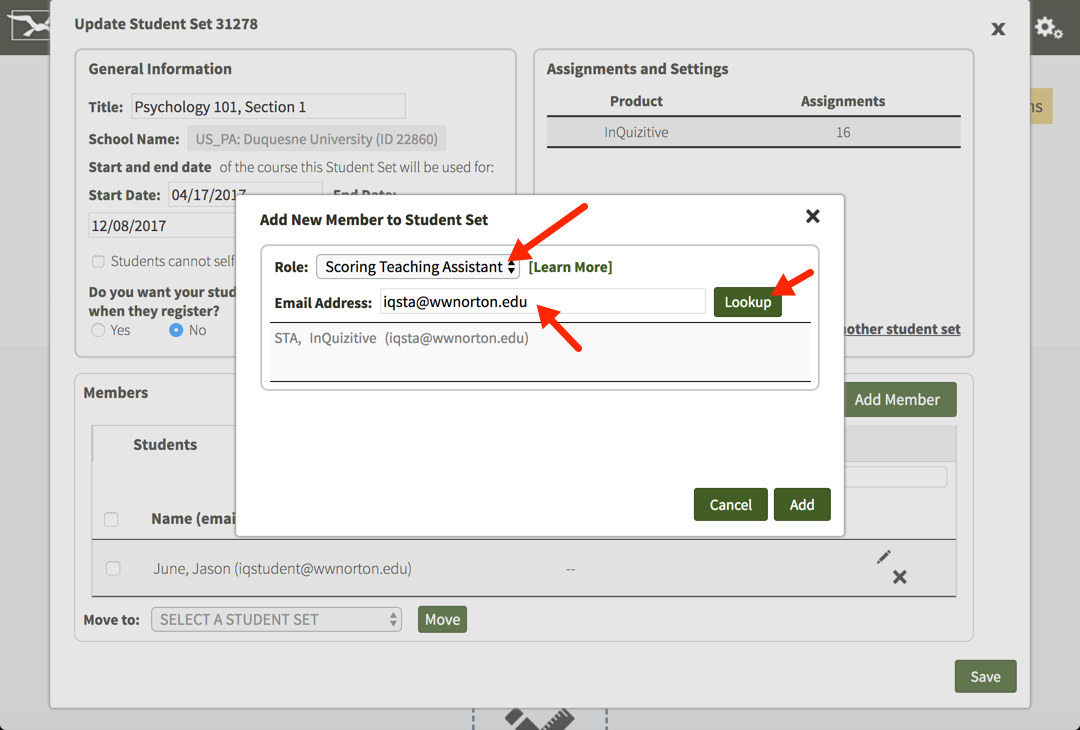
Click on the Add button to add the Scoring Teaching Assistant or Teaching Assistant to your Student Set.
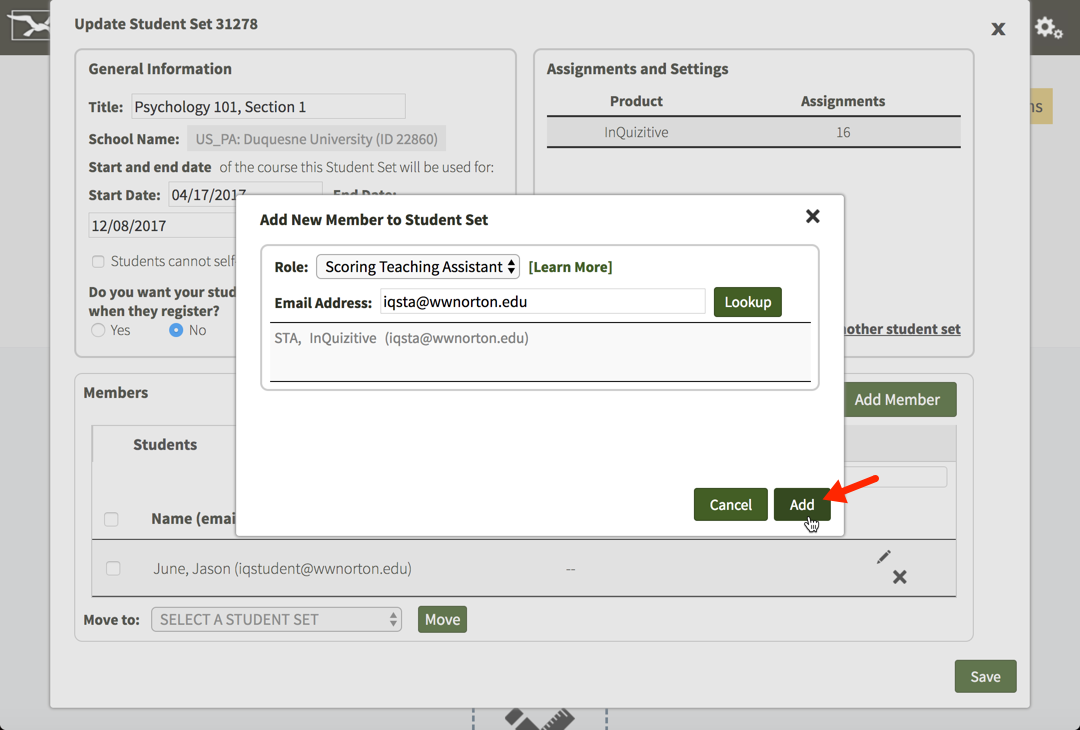
When you are finished updating your Student Set, click on the Save button in the lower-right corner to save your changes.
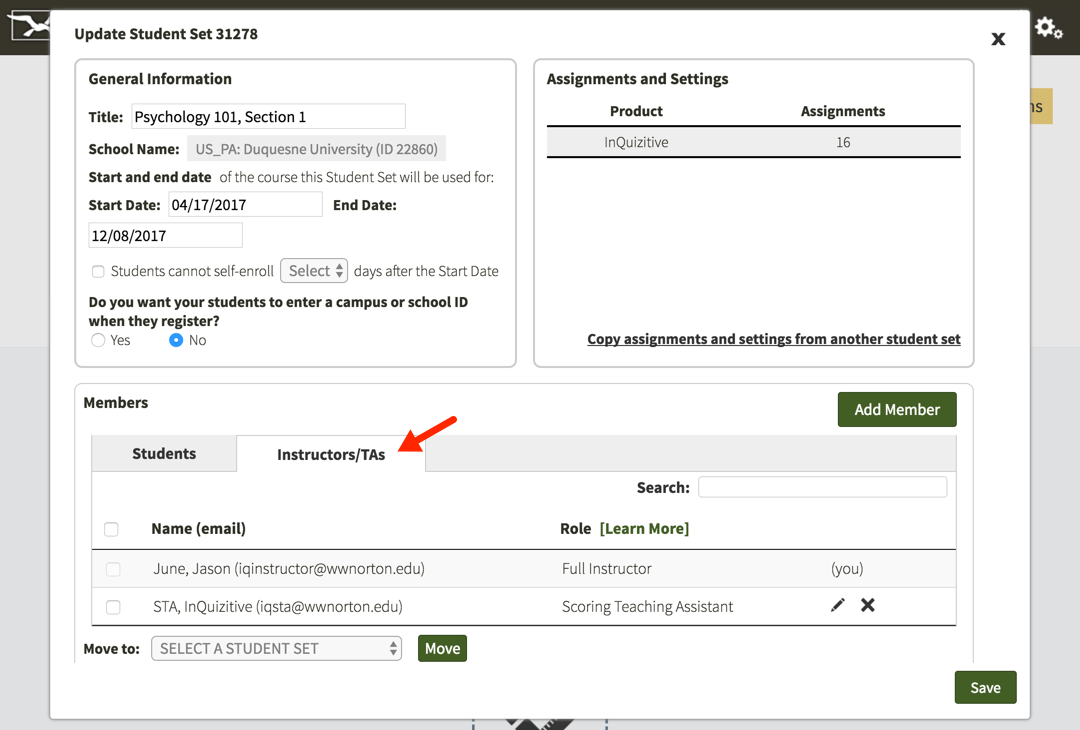
How do I remove Co-Instructors, Teaching Assistants, or Scoring Teaching Assistants from my Student Set?
Click the gear menu at the upper-right of the page and select Manage Student Sets from the menu.
Click the Update button to the right of the Student Set from which you would like to remove a co-instructor, Scoring TA, or TA.
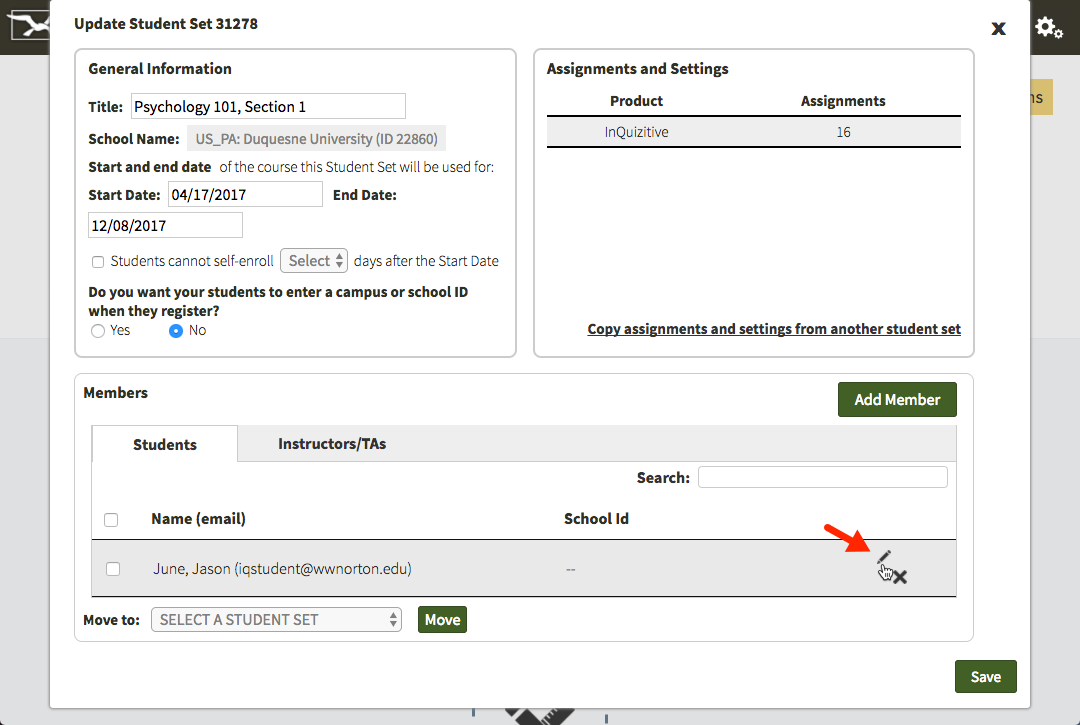
In the Members section, click on the Instructors/TAs tab.
Click on the X icon to the right of the co-instructor, Scoring Teaching Assistant, or Teaching Assistant that you would like to remove from your Student Set.
Note: Removing a Scoring Teaching Assistant or a Teaching Assistant does not reset or change their access to Norton digital products; it only removes them from your Student Set.
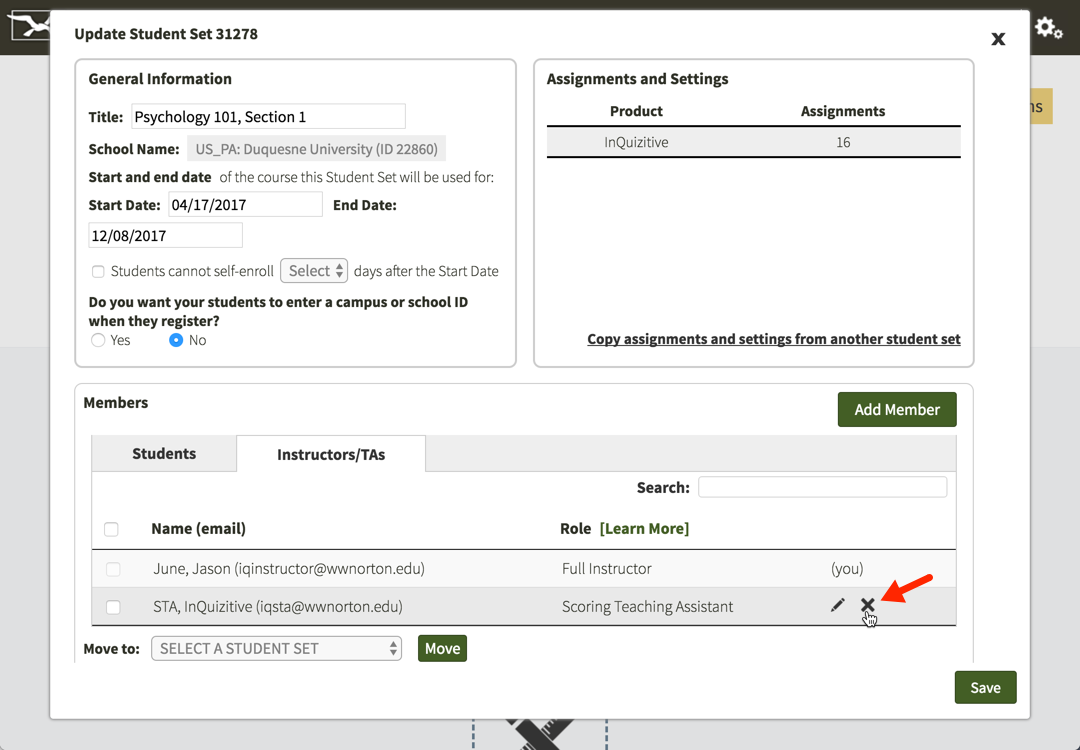
When you are finished updating your Student Set, click on the Save button in the lower-right corner to save your changes.
Can I require students to enter a school ID?
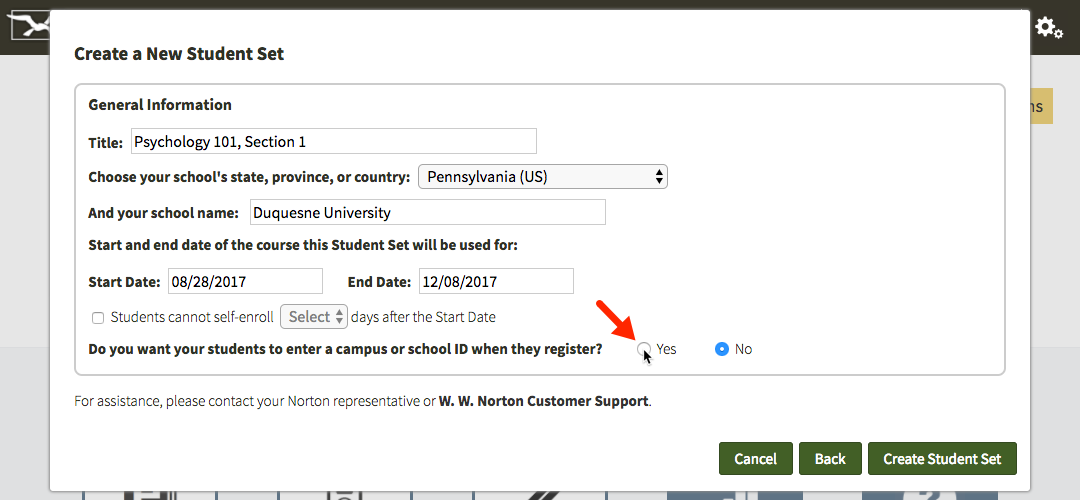
Require students to enter a school ID in a new Student Set
Click on the gear icon in the upper-right corner and select Manage Student Sets from the menu.

Click on the Create New Student Set button.
Option 1. Create a new Student Set from scratch will be selected by default. Click on the Next button.

Enter a title for your new Student Set; choose your school's state from the dropdown menu; begin typing your school's name into the text box that appears and select your school from the list; and select start and end dates for you Student Set.
Select “Yes” to the right of “Do you want your students to enter a campus or school ID when they register?”
You will then have the opportunity to change the label of the school ID for your Student Set. The default label “School ID” will be automatically populated into the text field, but please feel free to change this to anything you'd like. This label will be displayed when your students are asked to enter their ID and when you review student grades. School IDs can contain letters and numbers and they do not have a minimum or maximum length.
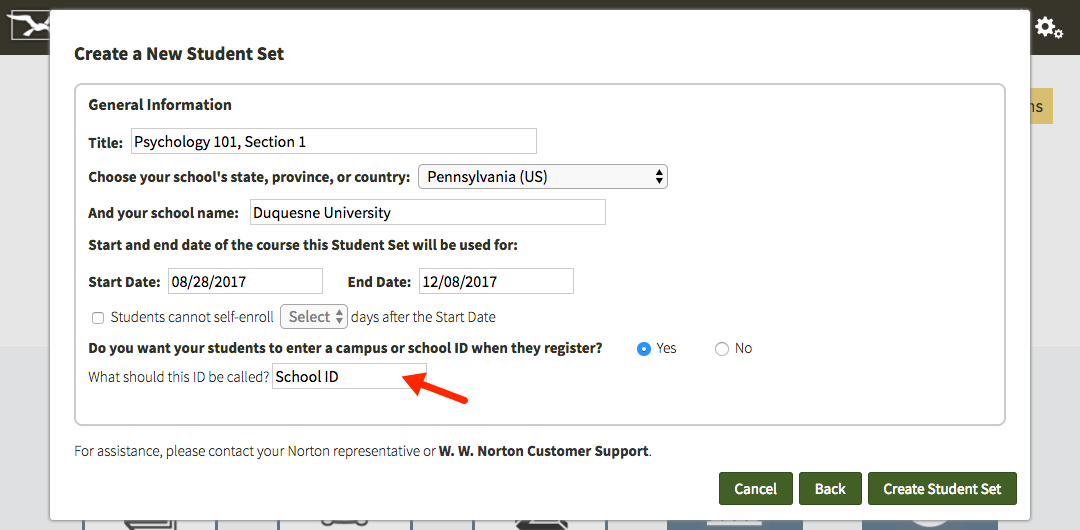
Finally, click the Create Student Set button and you will be given your new Student Set ID. Make a note of the Student Set ID and distribute it to your students so that they can join this Student Set.

When your students first join this Student Set, they will be asked to enter their school ID. If students are unsure of their school ID or do not yet have one, they can simply click the Next button to add themselves to the Student Set and continue on to the digital resources. The next time they log in to access the digital resources, they will be asked to enter their school ID again. Students will be asked to enter their school ID each time they access the digital resources until they finally enter one.

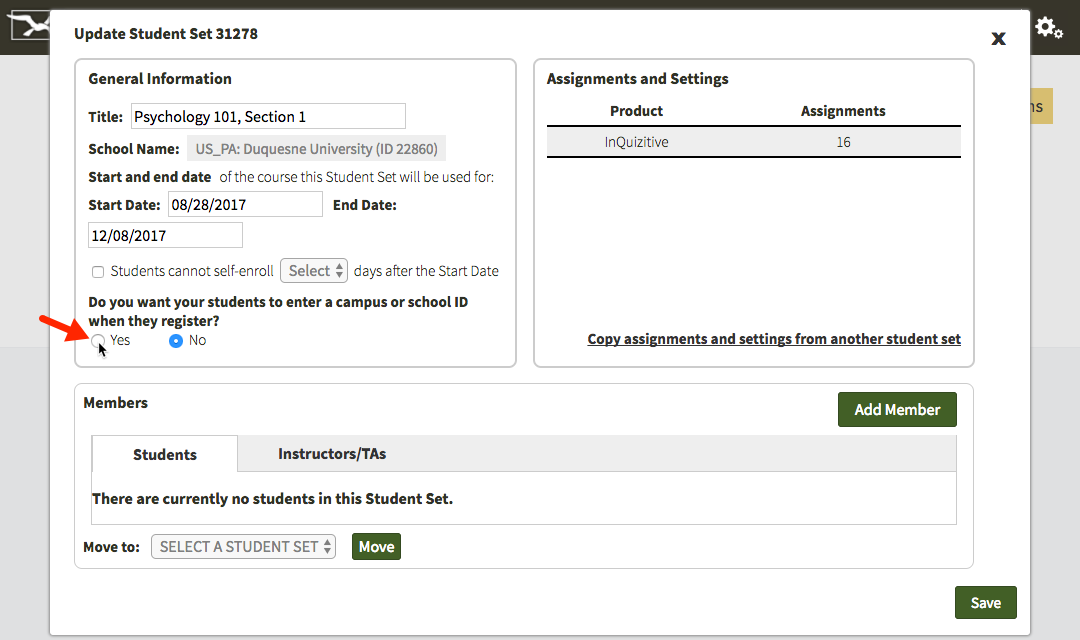
Require students to enter a school ID in an existing Student Set
You can update an already-existing Student Set to require a school ID. Click on the gear icon in the upper-right corner and select Manage Student Sets from the menu.

Click on the Update button to the right of the Student Set for which you would like to require an ID.

Select Yes under Do you want your students to enter a campus or school ID when they register?
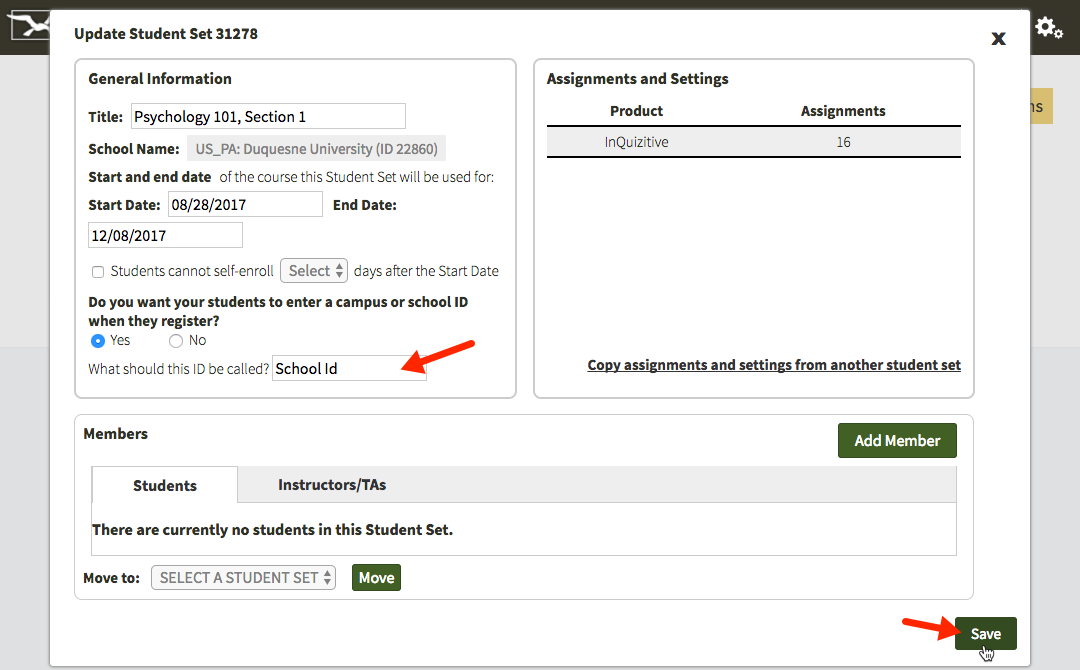
You will then have the opportunity to change the label of the school ID for your Student Set. The default School ID will be automatically populated into the text field but feel free to change this to anything you'd like. This label will be displayed when your students are asked to enter their ID and when you review student results. School IDs can contain letters and numbers and they do not have a minimum or maximum length. Click on the Save button when you are finished.
The next time your students log in and access the digital resources, they will be asked to enter their school ID. If students are unsure of their school ID or do not yet have one, they can simply click the Next button to continue on to the digital resources. The next time they log in to access the digital resources, they will be asked to enter their school ID again. Students will be asked to enter their school ID each time they access the digital resources until they finally enter one.
Can I prevent students from enrolling in a Student Set after a specific number of days?
Prevent students from enrolling after a specific number of days in a new Student Set
Click on the gear icon in the upper-right corner and select Manage Student Sets from the menu.

Click on the Create New Student Set button.

The first option will be selected by default. Click on the Next button.

Enter a title for your new Student Set; choose your school's state from the dropdown menu; begin typing your school's name into the text box that appears and select the proper school from the list; and lastly, select start and end dates for your Student Set.
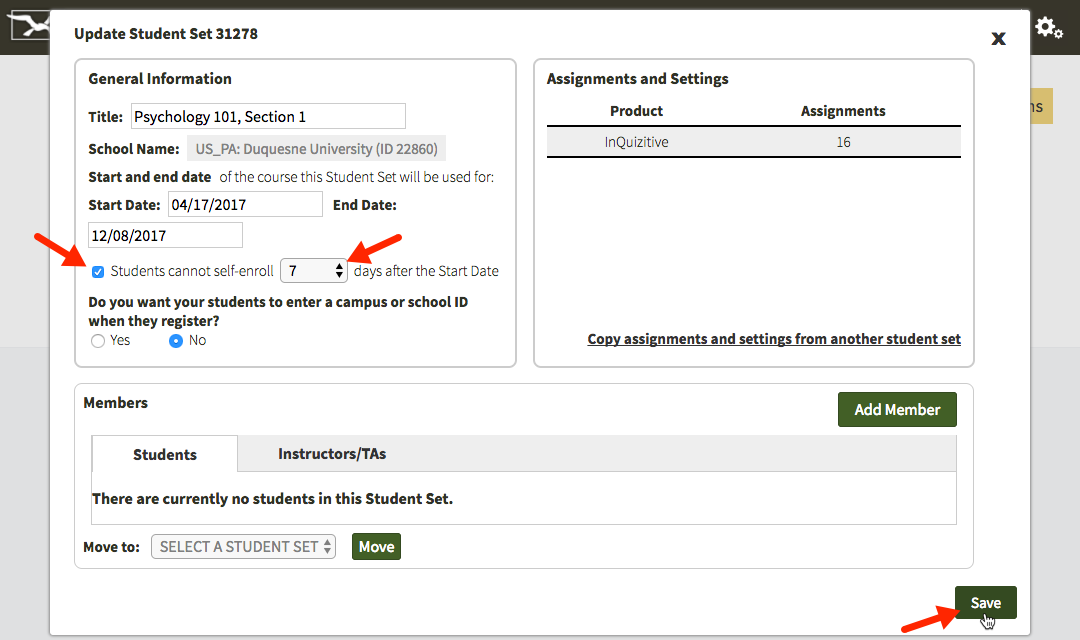
Click the checkbox to the left of Students cannot self-enroll [Select] days after the Start Date and use the Select dropdown menu to choose how many days after the start date of your Student Set you would like to close the self-enrollment period. You can select any number from 5 to 100 days after the start date.
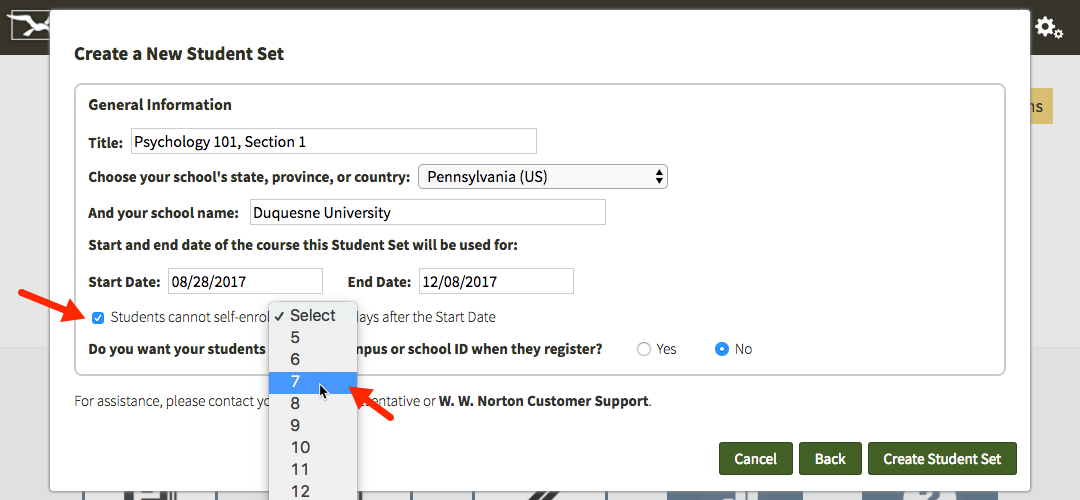
Finally, click the Create Student Set button and you will be given your new Student Set ID. Make a note of the five-digit Student Set ID and distribute it to your students so that they can join this Student Set.
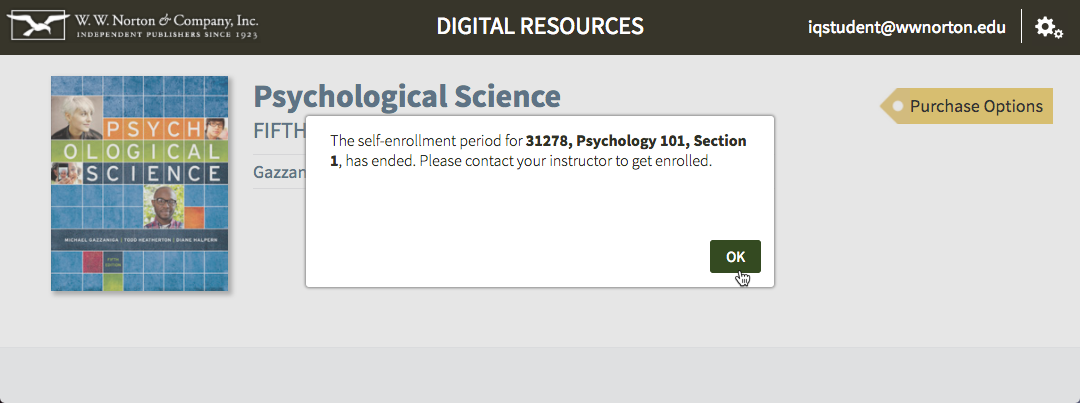
Any students who try to join this Student Set after the self-enrollment period has ended will receive the message below. Since the self-enrollment period has ended, you will need to add students manually to the Student Set from that point on.
Prevent students from enrolling after a specific number of days in an existing Student Set
Click on the gear icon in the upper-right corner and select Manage Student Sets from the menu.

Click on the Update button to the right of the Student Set for which you would like to end the self-enrollment period after a specific number of days.

Click the checkbox to the left of Students cannot self-enroll [Select] days after the Start Date and use the Select dropdown menu to choose how many days after the start date of your Student Set you would like to close the self-enrollment period. You can select any number from 5 to 100 days after the start date. Click the Save button when you're finished.
Any students who try to join this Student Set after the self-enrollment period has ended will receive the message below. Since the self-enrollment period has ended, you will need to add students manually to the Student Set from that point on. Review the next section of the article to add a student manually to a Student Set.

How do I manually add a student to a Student Set?
When registering for Norton digital products, your students will be prompted to enter the Student Set ID number to join your Student Set. However, you can also manually add them to your Student Set by clicking "Add Member." A window will pop up to add a new member to the student set. You can select the role of Student, type in their email address and click "Lookup" to see if they are registered. If they are registered, their name and email address should appear in the space below the email address field. Click "Add" to add the student.
Your student must have a Norton account in order for you to add them to your Student Set successfully.
How do I move students from one Student Set to another?
Note: Grades DO NOT transfer when moving a student from one Student Set to another. A warning to this effect will pop up before you can complete the transfer.
Click on the gear icon in the upper-right corner and select Manage Student Sets from the menu.

Click on the Update button to the right of the Student Set in which the student is currently enrolled.

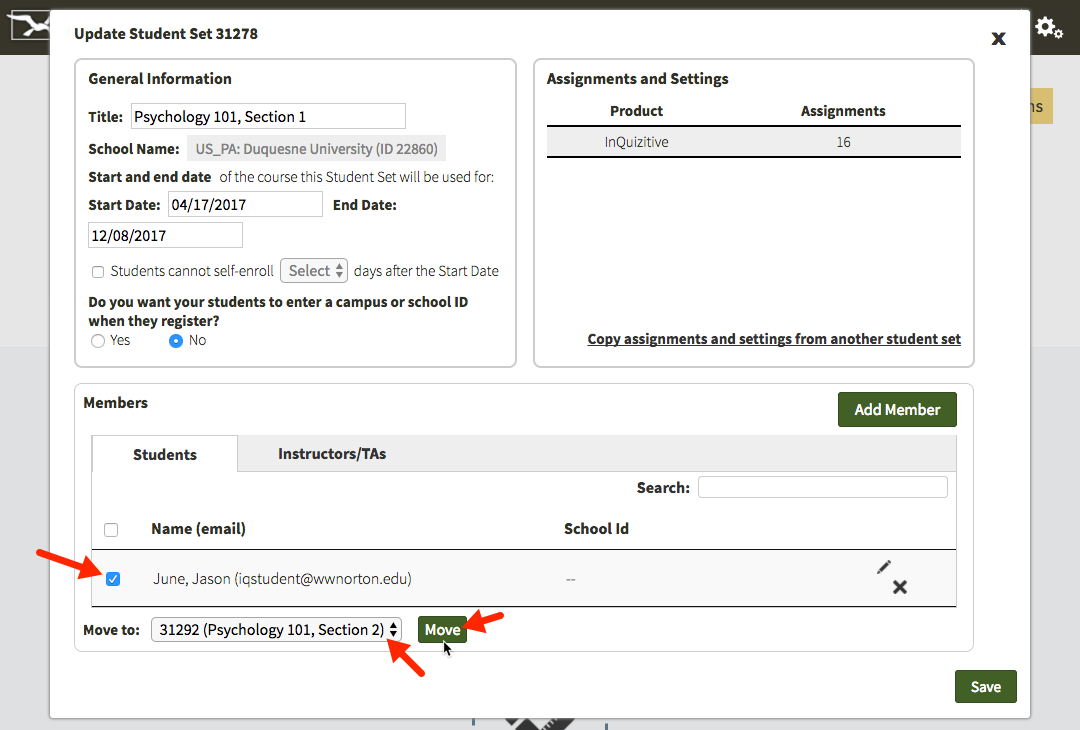
In the Members section, locate the student you would like to transfer to another student set and click the checkbox to the left of his or her name. Using the dropdown menu to the right of Move to: select the new Student Set and click the Move button.
How do I edit student information within a Student Set?
Click on the gear icon in the upper-right corner and select Manage Student Sets from the menu.
Click on the Update button to the right of the Student Set in which the student is currently enrolled.
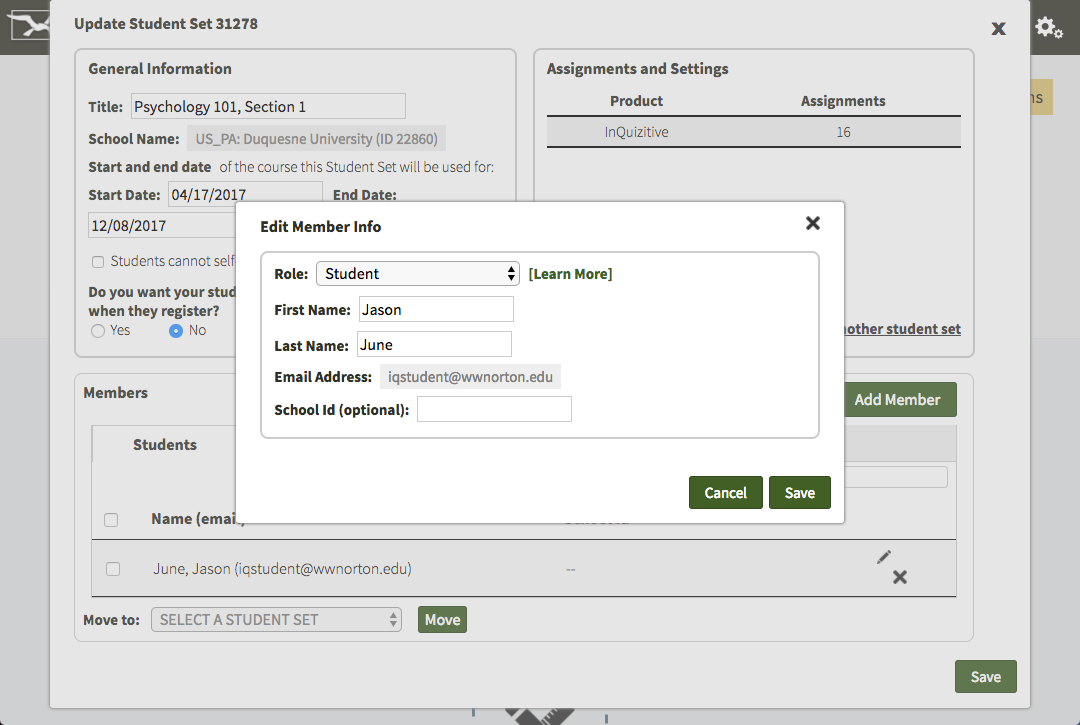
Click on the pencil icon to the right of the student whose information you would like to modify.
Using this window, you can adjust the role of the student, change the first or last name, and add or edit a School ID. There is no way for instructors to change a student's email address. If you have a student who needs to make a change to their email address, they can do it themselves within 14 days of account creation by clicking on Change Your Address in the gear menu. If 14 days have already passed since they registered their account, ask them to contact the W.W. Norton Service Desk for assistance.
How do I remove a student from my Student Set?
You may wish to remove students (e.g., those who have dropped the course) from their Student Sets so that reports align with your current rosters. Removing a student will also permanently delete that student’s grade record from your Student Set. Note: This action cannot be undone.
Click on the gear icon in the upper-right corner and select Manage Student Sets from the menu.
Click on the Update button to the right of the Student Set in which the student is currently enrolled.
Search the student's name in the Students tab of the Members section and click on the X in their row.
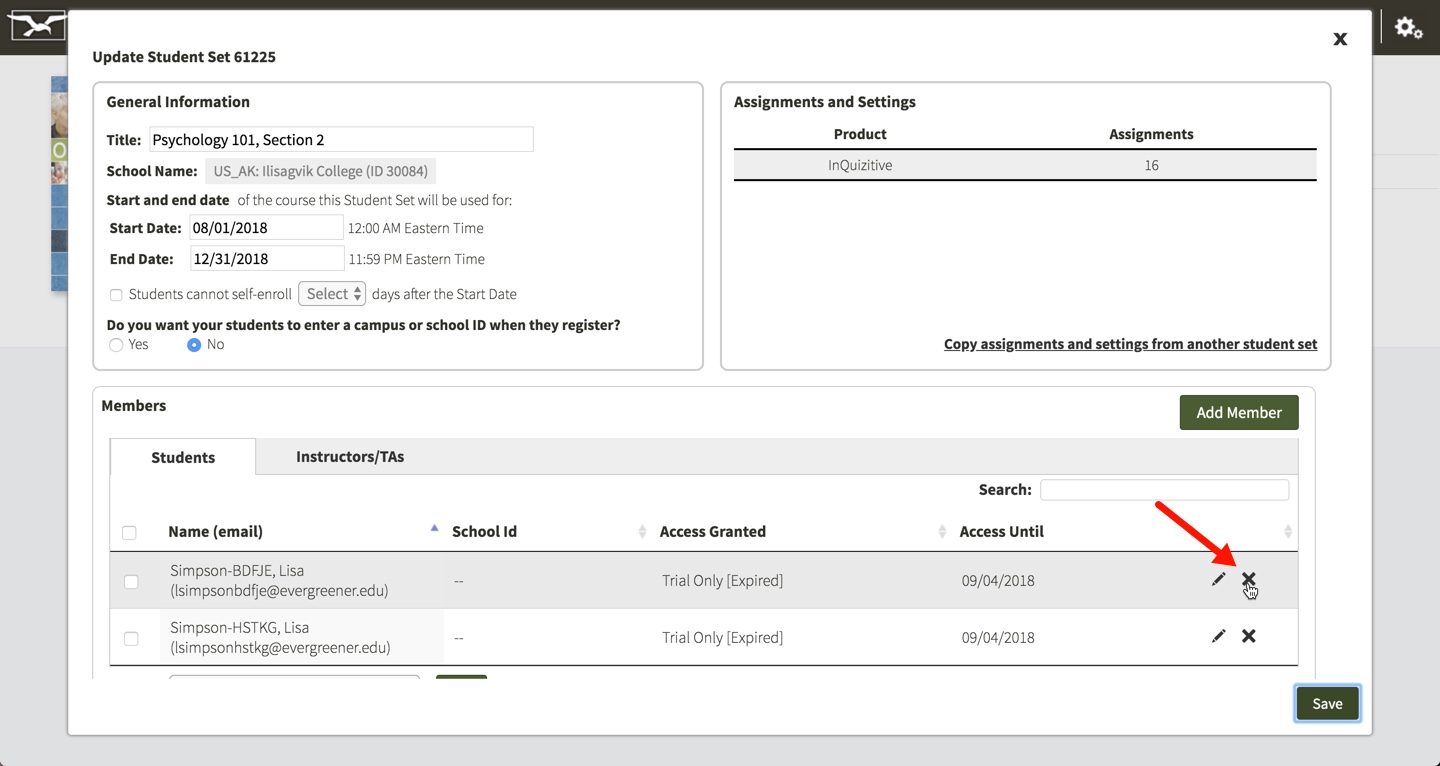
You will see a pop-up window to confirm that you'd like to remove this student from your Student Set. Click Remove to finalize removing the student or Cancel if you've changed your mind. Please note that removing a student from your Student Set cannot be undone.
How do I view whether a student has access to my Student Set?
Click on the gear icon in the upper-right corner and select Manage Student Sets from the menu.
Click on the Update button to the right of the Student Set in which the students are currently enrolled.
All of the students in the Student Set are listed here.
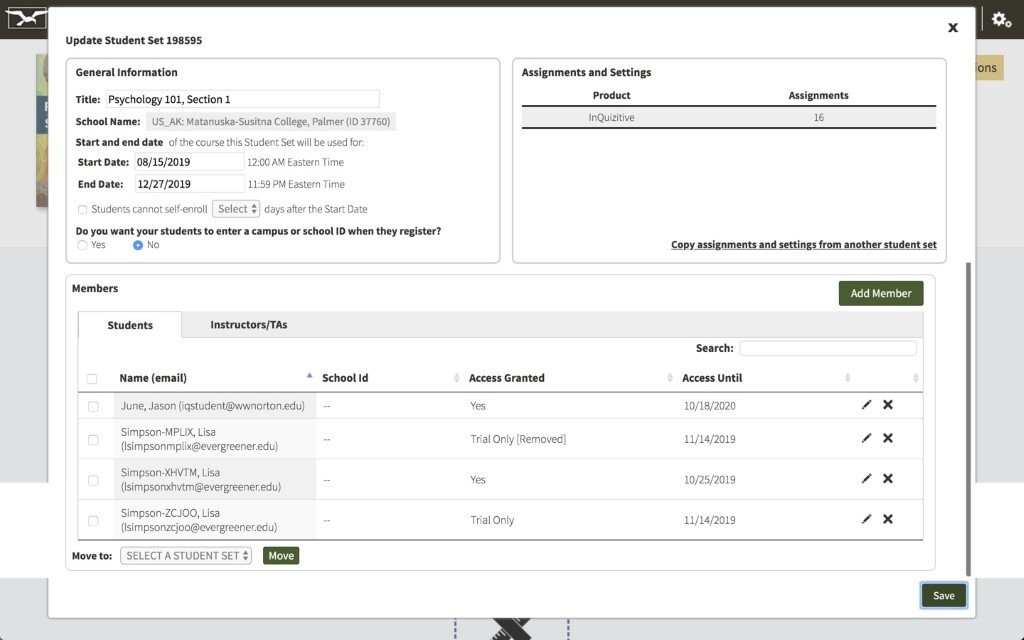
In the Update Student Set overlay, you can easily view whether students in your Student Set have obtained an entitlement to digital products associated with your Student Set or not. The Access Until column allows you to view the date through which the student has access to the associated entitlement. The Access Granted column displays information related to the type of entitlement the student currently has.
-
Trial Only: The student is currently registered for 21 days of trial access to the digital product associated with your Student Set.
-
(Rare) Trial Only [Removed]: The student registered for 21 days of trial access to the digital product associated with your Student Set and the entitlement was removed from their account by a Norton administrator.
-
Trial Access [Expired]: The student had 21 days of trial access to the digital product associated with your Student Set and the entitlement is past the end date.
-
Yes: The student has registered an access code or purchased access to the digital product associated with your Student Set.
-
Yes [Removed]: The student has registered an access code or purchased access to the digital product associated with your Student Set and the entitlement was removed from their account by a Norton administrator. This is typically seen when a student has opted out in an Inclusive Access course.
-
Yes [Expired]: The student has registered an access code or purchased access to the digital product associated with your Student Set and the entitlement is past the end date.
-
No: The student has no entitlement to the digital product associated with your Student Set but is in the Student Set.
*Please note you cannot make changes to the Access Granted and Access Until information for the students.
Are there any how-to videos available?
Yes, indeed! Here are some videos to help both you and your students get started.
For instructors:
For students:
Still need help? Submit a support ticket and a customer support specialist will be happy to assist you.Submit a Support Request
Opened a request already? Click here for an update.